There is a new update to the SV ++ Utility!! version 8.6.4 now available!
Check out the downloads or SV ++ blog sections
Monday, October 24, 2016
Monday, October 10, 2016
Oracle Smart View for Office 11.1.2.5.610 - Patch Set Update (Patch 24711736)
Oracle Smart View 11.1.2.5.610 GA build is now available!
The download and install from My Oracle Support: download
Or search for patch# 24711736
New Features in this version
The download and install from My Oracle Support: download
Or search for patch# 24711736
New Features in this version
- New VBA Functions
- Planning and Budgeting Cloud Service Features
- Locating New Features Information for Past Releases
New VBA Functions
Several new VBA functions are introduced in this release. At this time, these functions are supported by Essbase only.- HypCreateRangeGrid enables users to refresh multiple selected or named ranges of cells in a multiple-grid worksheet. You can also use it to add a grid in the selected range if there is not already a grid in the particular location, thus creating a multiple-grid sheet. If the ranges specified for this function contain more rows or columns than the actual grid has, the additional rows and columns are treated as comments and are thus part of the grid.
- HypSubmitSelectedRangeWithoutRefresh
updates the database with data, as is, from the selected data range; it
ignores cells outside the selected range and does not overwrite (or
refresh) them. The selected range does not automatically get refreshed
after submit; the user must manually refresh the grid to retrieve the
updated data. For a successful submit, the user must select a range
which constitutes a valid grid.
This function requires Oracle Hyperion Provider Services release 11.1.2.4.13. - HypSubmitSelectedDataCells allows the selected data cells to be submitted. For free-form grids, this VBA function allows selected blank cells to be submitted as #Missing.
These VBA functions are described in detail in the Oracle Smart View for Office Developer's Guide.
In
forms, Planning administrators and form designers can set up
easy-to-use drop-down member selectors on row dimensions. When these
drop-down selectors are enabled, the form users can directly select a
member from the drop-down list on the row dimension in the form. The
drop-down member selector also allows users to add data to member rows
that may have otherwise been suppressed.
For the Smart View user, keep in mind the following:
For the Smart View user, keep in mind the following:
- There is no visual notification as to which members have drop-downs enabled; you must click a dimension cell and, if a down arrow appears next to the cell, then there is a drop-down list enabled.
- The drop-down content (list of members) is controlled by the form definition for the corresponding segment.
- Selections are not retained. The drop-down selection will be lost on refresh. If you perform a Refresh after selecting a member from the drop-down, the selection is lost and the form returns to its original state.
- The drop-down selection will be lost on saving data. Modifying data cells and saving the Excel worksheet will not retain modified drop-down selections.
To use this
feature in Smart View requires configuration in the Form Designer in the
Planning web interface. The Planning administrator or form designer
specifies the drop-down selectors as segment properties for particular
dimensions. For example, suppose there are two dimensions placed on row
axes, Entities and Line item; the member selector drop-down may be
enabled for the Entity dimension members, for the Line item dimension
members, or for both. Configuration is described in Administering Planning for Oracle Planning and Budgeting Cloud.
This release changes the way you access the User Preferences dialog box from the Smart View Panel. Instead of accessing the dialog box from the plan level, you access User Preferences from the application level.
Additionally, you will no longer be prompted to select a plan type. Instead, the preferences you set will apply to all plan types.
Additionally, you will no longer be prompted to select a plan type. Instead, the preferences you set will apply to all plan types.
- For Smart View Release 11.1.2.5.600, see the Oracle Smart View for Office New Features available in the Smart View 11.1.2.5.600 library available on the Oracle Help Center.
https://docs.oracle.com/en/applications/?tab=8 - For new features relating to Oracle Enterprise Performance Management System installation, architecture, and deployment changes in this release, see “New Features in this Release” in the Oracle Enterprise Performance Management System Readme.
- Use
the Cumulative Feature Overview tool to review the list of new features
added between earlier releases for Smart View and other EPM System
products. This tool enables you to identify your current products, your
current release version, and your target implementation release version.
With a single click, the tool quickly produces a customized set of
high-level descriptions of the product features developed between your
current and target releases. This tool is available here:
https://support.oracle.com/oip/faces/secure/km/DocumentDisplay.jspx?id=1092114.1
Wednesday, September 28, 2016
Smart View Tips & Options
Not to take away anyone's Thunder & Lightning from Oracle Open World this year, I was not in attendance, but it seems from all of the emails, posts, tweets and other social media outlets that, well, there is a push for all things Cloud?!?!
But in other news, for those of you that still need to use Smart View, here are a few tips, options, settings etc. for you to keep in mind to help in your data retrieval journey while you are not cloud surfing.
First, when you install Smart View, this link can be a great tool to read over for both Admins and Users alike: Oracle Smart View for Office Release 11.1.2.5.600 Installation and Configuration Guide
There are a few great sections:
I hope that the links, tips and options help all users easliy hurdle some of the more common questions that I get from users and also see on many blogs and forums.
In preparation for soon to be submitted KScope 17 abstracts, the deadline is quickly approaching, Oct-14th!, I hope that you are able to Wrangle some more data via Smart View .. or in my case, maybe not Smart View, stay tuned!
But in other news, for those of you that still need to use Smart View, here are a few tips, options, settings etc. for you to keep in mind to help in your data retrieval journey while you are not cloud surfing.
First, when you install Smart View, this link can be a great tool to read over for both Admins and Users alike: Oracle Smart View for Office Release 11.1.2.5.600 Installation and Configuration Guide
There are a few great sections:
- Installing Smart View
- Administering Extension Installations and Updates
- Accessing Shared Connections from an XML File
- Installing and Configuring Help Locally or on a Web Server
- Tips and Troubleshooting
- Limitations
- Diagnostics Tools
- Installation and Languages
- Windows, Office, and Smart View Locale Settings
- Error When First Launching Excel After Installing Smart View
- Internet Explorer Compatibility View Settings for Financial Reporting
- Working with Custom HTML-based Login Forms
- Browser Settings When Working with XML Files on HTTP Server
- Flickering Issues on Office 2013 32-bit and 64-bit
- Issues When Starting Excel in Automation Mode
- Slowness with Extension Options Dialog Box
- Performance and Memory Usage Considerations for Smart View with Excel
- Smart View HTTP Session Timeout
- Duplicate Queries in Word Slow to Refresh
- Issues with Dynamic Data Exchange Option in Excel
- Transition Navigation Keys Not Supported
I hope that the links, tips and options help all users easliy hurdle some of the more common questions that I get from users and also see on many blogs and forums.
In preparation for soon to be submitted KScope 17 abstracts, the deadline is quickly approaching, Oct-14th!, I hope that you are able to Wrangle some more data via Smart View .. or in my case, maybe not Smart View, stay tuned!
Wednesday, September 7, 2016
Information Regarding NEW Smart View Installs (Doc ID 2174747.1)
posted by Oracle yesterday, Sep-06-2016
Information Regarding NEW Smart View Installs: New Installs Displays Certificate Message: "Warning: The digital signature on the application add-in is invalid and cannot be trusted. Application add-in is disabled.The following new My Oracle Support Knowledge Article is available:
Doc ID 2174747.1
per the document:
Applies to:
- Hyperion Essbase - Version 11.1.2.4.000 and later
- Hyperion Planning - Version 11.1.2.4.000 and later
- Hyperion Financial Management - Version 11.1.2.4.000 and later
- Generic Windows
- This issue applies to all versions of Smart View
Symptoms
After installing Smart View and opening Excel, a Microsoft Office Security Options window opens with:
"Warning: The digital signature on the application add-in is invalid and cannot be trusted. Application add-in is disabled."
This affects all new installations of Smart View. Existing installations are not impacted.
Changes
New installation of Smart View.
Cause
The certificate for the "Digital Signature" for the HsTbar.xla has expired. This is used for Spreading and VBA's.
Solution
To workaround the certificate warning:
- Install Smart View ("Run as Administrator"). Do not launch Excel prior to performing the next step.
- Rename the HsTBar.xla file to HsTBar.xla_badcert. This file is located in the \SmartView\bin folder.
- Launch Smart View.
Wednesday, August 31, 2016
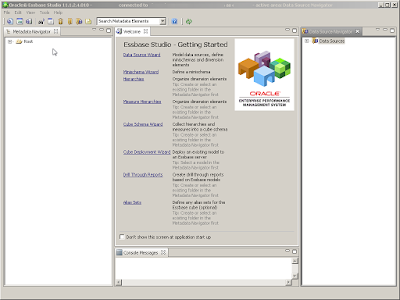
Not Just Any Essbase Studio Drill-Through!
It has been a long time coming to finally enable Essbase Drill-Through reports!
 But not just any Essbase Drill-Through reports. These are reports against an OBIEE Subject Area. And again, not just any ole' Subject Area. The Subject Area is a Pivotal Greenplum data source!
For the last plus year, I have been wanting to enable Drill-Through reports using Essbase Studio (build Essbase ASO cube model(s) plus create reports). The main and only reason that I was interested in using Studio for the cube build and deploy was for the ability to provide Drill-Through reports using the SQL-type reports!
Why? If you are not familiar, SQL-type Drill-Through reports run the SQL and 'spawn' a new worksheet of the SQL results in that worksheet in the current workbook! Truly an amazing, brilliant and mind blowing feature!
If you are not familiar to what the drill-through report feature is, a brief explanation is this... Once you create your cube (model) in Essbase Studio, hierarchies, dimensions, Alias, etc. and finally cube deployment, you can also create Drill-Through reports.

In creating reports, there are 3-options (types) in the Essbase Studio client:

1 - Relational-type (SQL)
2 - URL-type
3 - Java Method-type
I am going to go over the URL-type and only mention that I have not been able to wrangle up any viable examples and/or documentation on how/why/where/who of the 3rd, Java-type is being used or is in use.
URL-type drill through reports. These are pretty much as you would think. When creating the report, you define the grid (POV) context for the report.
In the screen captures (below), I am passing 2 contexts;
for Time (Period & Year).

This is pretty straight forward.
In short, you are defining the intersections to be enabled by Smart View for drill-through. The intersections can be defined by either Levels or Generations in the cube model.
You can either click the 'Add' button or simply drag and drop the desired hierarchy from Metadata Navigator into the 'Intersections' window.
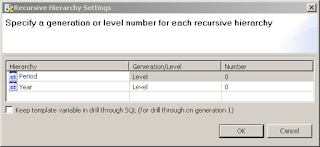
The "Advanced Settings..." is where you can, in addition, define the hierarchy Generation or Level for each dimension context.
In this case, both hierarchies are set at Level-0.
You then go to the next tab, 'Report Contents', select the URL-type radio button.
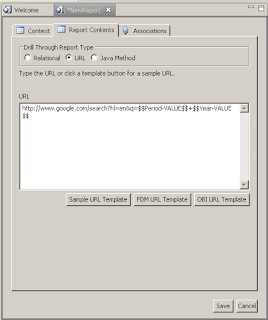
In this example, I am using the Sample URL Template (Google search). This is actually a good way to validate that the drill report contexts are getting passed properly to the report being executed.
You can see from the syntax, created for you, that the 2 contexts on the previous tab where placed directly into the URL drill path as needed plus in the proper syntax format just the same.
The context, as stated in the Essbase Studio guide is as follows:
$$Period-VALUE$$
$$Year-VALUE$$
By using this, the drill-through report will run against these members from your Smart View reporting grid (POV) and the specific intersection of data that is being called on for the drill-though report.
Now, the last and final step, is to associate the drill-through report to the desired cube (model).

Simply make sure that the checkbox is checked for the cube or cubes that make sense to enable the desired drill-through report.
Click 'Save'.
Now, that might still leave you without seeing your drill-through report in Smart View! Don't get frustrated. I will try and save you the time, as I was able to breakthrough and find this workaround that worked for me.
The workaround:
## Note you do NOT have to re-deploy the entire cube ##
Only for the hierachy(s) that you have used as a context.
You can use the Cube Deployment Wizard to do a partial cube build. While retaining all of the data already loaded.

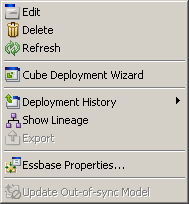
From the Metadata Navigation window, Expand the Cube Schema and Right click on the Essbase Model.
You should now see a menu list.
Select "Cube Deployment Wizard"
Make the selections accordingly:
Server, Application, Database
Click Next
Build outline
Check the box "Incremental load"

Click Next

This is important assuming that you don't want to rebuild the entire cube and redeploy again.
Make sure to select the radio button:
"Update or rebuild selected hierarchies"
Choose the dimensions that are associated contexts in which the drill through report(s) were created.
Make sure if you want to retain any data already loaded in the cube that you 'Preserve: All Existing Data'. Update or Rebuild, click-one of the buttons; your choice.
Click 'Finish'
#######
Going back and a little bit of background on the setup.
For the last plus year, I have been wanting to enable Drill-Through reports using Essbase Studio (build Essbase ASO cube model(s) plus create reports). The main and only reason that I was interested in using Studio for the cube build and deploy was for the ability to provide Drill-Through reports using the SQL-type reports!
Why? If you are not familiar, SQL-type Drill-Through reports run the SQL and 'spawn' a new worksheet of the SQL results in that worksheet in the current workbook! Truly an amazing, brilliant and mind blowing feature!
If you are not familiar to what the drill-through report feature is, a brief explanation is this... Once you create your cube (model) in Essbase Studio, hierarchies, dimensions, Alias, etc. and finally cube deployment, you can also create Drill-Through reports.


In creating reports, there are 3-options (types) in the Essbase Studio client:

1 - Relational-type (SQL)
2 - URL-type
3 - Java Method-type
I am going to go over the URL-type and only mention that I have not been able to wrangle up any viable examples and/or documentation on how/why/where/who of the 3rd, Java-type is being used or is in use.
URL-type drill through reports. These are pretty much as you would think. When creating the report, you define the grid (POV) context for the report.
In the screen captures (below), I am passing 2 contexts;
for Time (Period & Year).

This is pretty straight forward.
In short, you are defining the intersections to be enabled by Smart View for drill-through. The intersections can be defined by either Levels or Generations in the cube model.
You can either click the 'Add' button or simply drag and drop the desired hierarchy from Metadata Navigator into the 'Intersections' window.

The "Advanced Settings..." is where you can, in addition, define the hierarchy Generation or Level for each dimension context.
In this case, both hierarchies are set at Level-0.
You then go to the next tab, 'Report Contents', select the URL-type radio button.

In this example, I am using the Sample URL Template (Google search). This is actually a good way to validate that the drill report contexts are getting passed properly to the report being executed.
You can see from the syntax, created for you, that the 2 contexts on the previous tab where placed directly into the URL drill path as needed plus in the proper syntax format just the same.
The context, as stated in the Essbase Studio guide is as follows:
$$Period-VALUE$$
$$Year-VALUE$$
By using this, the drill-through report will run against these members from your Smart View reporting grid (POV) and the specific intersection of data that is being called on for the drill-though report.
Now, the last and final step, is to associate the drill-through report to the desired cube (model).

Simply make sure that the checkbox is checked for the cube or cubes that make sense to enable the desired drill-through report.
Click 'Save'.
Now, that might still leave you without seeing your drill-through report in Smart View! Don't get frustrated. I will try and save you the time, as I was able to breakthrough and find this workaround that worked for me.
The workaround:
## Note you do NOT have to re-deploy the entire cube ##
Only for the hierachy(s) that you have used as a context.
You can use the Cube Deployment Wizard to do a partial cube build. While retaining all of the data already loaded.
From the Metadata Navigation window, Expand the Cube Schema and Right click on the Essbase Model.
You should now see a menu list.
Select "Cube Deployment Wizard"
Make the selections accordingly:
Server, Application, Database
Click Next
Build outline
Check the box "Incremental load"
Click Next

This is important assuming that you don't want to rebuild the entire cube and redeploy again.
Make sure to select the radio button:
"Update or rebuild selected hierarchies"
Choose the dimensions that are associated contexts in which the drill through report(s) were created.
Make sure if you want to retain any data already loaded in the cube that you 'Preserve: All Existing Data'. Update or Rebuild, click-one of the buttons; your choice.
Click 'Finish'
#######
Going back and a little bit of background on the setup.
- The Subject Area was created first (Pivotal Greenplum)
- The report/analysis was created in OBIEE to be able to launch the Drill-Through report as either 1-SQL or 2-URL based report but also passing the proper context(s) from Smart View
- The Essbase cube (model) was built & deployed, verified, validated, etc.
- Then create the drill-through reports in Essbase Studio were created
- Workaround: Redeploy hierarchy-dimensions as needed to 'enable' reports in context
Thursday, July 14, 2016
SV ++ Utility update!
Check out the latest update to the SV ++ utility ..
http://adashek-epm.blogspot.com/p/downloads.html
What's new:
Submit Data button enhancement


Shortcut Keys!


http://adashek-epm.blogspot.com/p/downloads.html
What's new:
Submit Data button enhancement
Shortcut Keys!
Subscribe to:
Posts (Atom)