OAC - Essbase WRITEBACK IS ALIVE!
Well, the day has finally arrived, Essbase Writeback in the cloud is real .. and a thing 😎🤓🤓😎
Let's get into the how-to and what it looks like.
But first, a BIG shout out to Gary Crisci for being able to battle the patch frontier and slay the OAC demons!
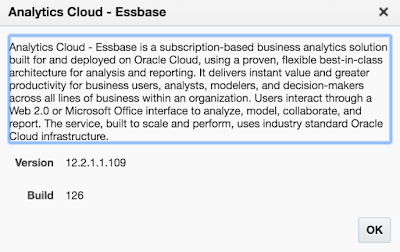
OAC - Essbase patched to version 109 .. skipped right over 108 to specifically Version 12.2.1.1.109 - Build 126
Steps to success
https://www.oracle.com/solutions/business-analytics/data-visualization/library.html


Well, the day has finally arrived, Essbase Writeback in the cloud is real .. and a thing 😎🤓🤓😎
Let's get into the how-to and what it looks like.
But first, a BIG shout out to Gary Crisci for being able to battle the patch frontier and slay the OAC demons!
OAC - Essbase patched to version 109 .. skipped right over 108 to specifically Version 12.2.1.1.109 - Build 126

Steps to success
- Create an Essbase cube in OAC (thought that this step and a few others might be obvious ..)
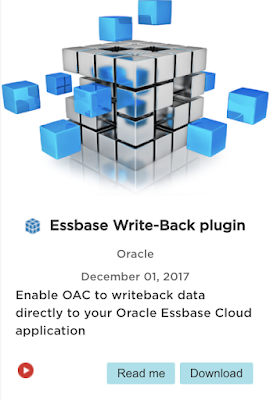
- Go to the Data Visualization Cloud - Oracle Analytics Library
https://www.oracle.com/solutions/business-analytics/data-visualization/library.html
- Find the Custom Plug-In: Essbase Write-Back plugin by Oracle

- Click Download to Download the zip file
- Log into the OAC - DV/BI instance
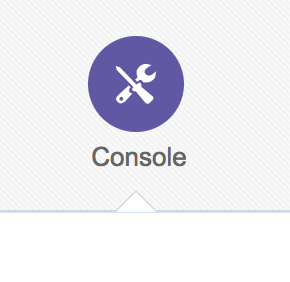
- Go to Console

- On the panel, click Custom Plugins

- Upload the saved Custom Plugin from the step above, drag and drop or click "Upload Custom Plugin" and select the zip file
- On the panel, click Safe Domains

- Click, "add domain"

- Domain Name: enter * (wildcard)
- Check all of the boxes: Image, Frame, Script, Font, Media, Connect

- Sign Out of OAC DV/BI
- Sign back into OAC DV/BI
- Navigate to Data Sources / Create / Connection / Oracle Essbase (Beta)
>>> When does this Connection Type not say (Beta)! <<<

Connection Details:
*New Connection Name: "Your Essbase Server"
*DSN: IP or host:Port /essbase /agent
ex. http://my.IP.address:80/essbase/agent
*Username: <AdminUsername>
*Password: <AdminPassword>
*Authentication: Always use this credentials??
- Click 'Save'
From the OAC - DV/BI Home
- Click Create .. Data Set ..
- Select the Newly created Connection
- Select the Essbase Cube that is a part of that Connection that you want
- Click 'Add'
You should see a notification "The Data Set was successfully saved."
- Now go ahead and create a Project
- Select the cube you added as a Data Source of the "Essbase Server" above
- Create your visualization adding the dimensions .. ALL of the dimensions
- Change the Visualization..

- Select the "Essbase Writeback" Viz

Now your Viz looks more like a reporting grid 😀 .. go ahead and double click a data cell .. and enter/change data .. Click 'Submit'
In this case I changed Sample Basic
Budget Sales May 400-10 Wisconsin from 90 to 100

Nice to see the cell change color to the muted yellow similar to either Workspace or Smart View
You should now get an inline popup window that is asking to re-validate the credentials in order to accept the data change being submitted to the cube..

Target Database Detail:
Should all be the same credentials that were used above
ex. http://my.IP.address:80/essbase/agent
*Username: <AdminUsername>
*Password: <AdminPassword>
- Click 'Fetch'
- Click the dropdown arrow for Application and make your selection
- Click the dropdown arrow for Database and make your selection
- Click 'OK'
.. and your grid should "Refresh" .. wait for it
and now be updated with the new data value(s) saved in the cube!!!!

Coming soon .. a blog post about the latest version of
Cube Designer Version 12.2.1.1.109 Build 126